
Fitting a bathroom vanity requires more than positioning the cabinet in place; you also need to connect the water supply and drainage system correctly. You also need to connect the faucet supply lines, drain assembly, and P-trap correctly to prevent leaks and drainage problems. With the right tools and careful preparation, many homeowners can complete a basic vanity replacement without changing the existing plumbing layout. This guide explains how to install bathroom vanity plumbing safely, from preparing the water lines to testing the finished connections.
Table of Contents
What You Need to Know Before Installing Vanity Plumbing
Bathroom vanity plumbing allows clean water to reach the faucet and carries used water away through the drain system. A typical setup includes separate hot and cold water hoses, a sink drain tailpiece, and a curved P-trap that connects to the household drainage pipe.
Before fitting your new vanity, compare its plumbing openings with the positions of the existing pipes. Choosing a cabinet that works with the current layout can simplify installation, save time, and help you avoid unnecessary plumbing changes. Read our guide to common bathroom vanity sizes to understand how vanity dimensions affect your bathroom layout and plumbing alignment.
You should also understand these basic components:
- Water supply lines: Flexible hoses that carry hot and cold water from the shutoff valves to the faucet.
- Shutoff valves: Valves that let you stop the water supply during installation or repairs.
- Drain assembly: The sink drain fitting and tailpiece that carry wastewater away from the basin.
- P-trap: The curved drain fitting that holds water to help block sewer gases from entering the bathroom.
- Drain stub-out: The section of drainpipe that extends from the wall or floor.
Knowing how these parts work together helps you plan the installation and identify compatibility problems before they become expensive repairs.
Tools and Materials Required
Gathering the right supplies before starting can save time and prevent unnecessary trips to the hardware store.
Tools
- Adjustable wrench
- Slip-joint pliers
- Tape measure
- Bucket and old towels
- Flashlight
- Screwdriver
- Level
- Drill and appropriate bits
- Pipe cutter or hacksaw, if needed
- Safety glasses
Materials
- Bathroom vanity cabinet and sink
- Compatible bathroom faucet
- Flexible faucet supply lines
- Suitable P-trap assembly
- Drain tailpiece and fittings
- Compatible shutoff valves, if replacement is necessary
- Cabinet mounting screws
- Shims for leveling
- Bathroom-grade silicone sealant
Before buying plumbing parts, review the installation guides for your faucet, sink drain, and vanity. Each product may require specific fitting dimensions, compatible connectors, or particular sealing materials. Confirm that all components match your existing plumbing setup to avoid installation delays and compatibility issues. If you are choosing a new sink and countertop, read our guide to cultured marble vanity tops with integral sinks to understand sink configurations and faucet-hole compatibility.
Step 1: Turn Off the Water Supply
The first step is to shut off the hot and cold water supply before disconnecting any plumbing.
Find the hot and cold water valves under the sink and close both securely. Next, turn on the faucet briefly to drain any remaining water pressure from the lines. Make sure the water has stopped flowing completely before disconnecting any plumbing connections.
If the valves do not stop the water completely, shut off the home’s main water supply before proceeding. Place a bucket beneath the connections because some water will remain inside the hoses and drain assembly.
Never remove a pressurized supply line. If a shutoff valve is damaged, heavily corroded, or difficult to operate, have it repaired or replaced before continuing.
Step 2: Disconnect the Existing Plumbing
Before taking out an existing bathroom vanity, detach the connected water supply and drain components. Set a bucket beneath the curved drain fitting to collect leftover water, then gently loosen the slip-joint nuts and remove the P-trap. Once the remaining water has drained, disconnect the hot and cold faucet hoses from their respective connections as required.
Keep a towel nearby to catch drips. If the existing drain uses glued fittings or the supply pipes require cutting, do not force the connections. Cutting or modifying fixed plumbing may require additional tools, replacement fittings, and professional assistance.
Once the plumbing is disconnected, remove the old vanity according to its mounting method. Inspect the exposed wall and pipes for moisture, corrosion, damaged fittings, or signs of previous leaks.

Step 3: Measure the New Vanity Plumbing Layout
Taking accurate measurements before installing a bathroom vanity helps protect existing pipes and makes the installation process easier.
Start by measuring the positions of the hot and cold water supply lines and the drainpipe. Use the finished wall and floor as reference points, then mark the corresponding locations on the back panel of the new cabinet wherever plumbing cutouts are required. If you’re choosing a compact cabinet for a smaller bathroom, explore our guide to 18-inch bathroom vanities to understand how vanity dimensions can affect available space and plumbing placement.
Temporarily move the vanity into its intended position and compare the marked measurements with the existing plumbing rough-in. Make each opening large enough for the pipes and fittings to pass through without forcing them into place. However, avoid cutting away excessive cabinet material, as this could weaken the back panel and affect the cabinet’s stability.
Next, check whether the sink drain tailpiece lines up with the wall drain outlet. The faucet supply hoses should also reach their respective shutoff valves comfortably without stretching, twisting, or bending sharply. Proper alignment makes bathroom sink plumbing installation easier and reduces unnecessary pressure on the connections.
Remember that a new vanity with a different height, width, or depth may not match the existing plumbing layout. Drawers, shelves, and cabinet supports can also interfere with water lines or drain fittings. If the replacement requires significant changes to the water supply lines, drainpipe, or plumbing rough-in, determine the necessary adjustments before securing the cabinet in place.
Step 4: Position and Secure the Vanity Cabinet
Set the vanity cabinet in its planned position and place a spirit level on top to ensure it is straight and balanced. If the floor is uneven, insert suitable shims beneath the cabinet base until the vanity sits level and stable.
Find the wall studs and secure the cabinet using suitable fasteners recommended by the manufacturer. A freestanding vanity should not be left unsecured if its installation instructions require wall anchoring.
For a floating bathroom vanity, use the specified mounting system and appropriate structural support. These units carry their weight through the wall, so ordinary cabinet screws may not provide adequate support.
Once the cabinet is secure, check the plumbing openings again. Make sure the supply pipes and drainpipe are accessible and that the cabinet does not press against or damage any fittings.
Step 5: Install the Faucet and Sink Drain
Installing the faucet and drain before making the final plumbing connections often provides more working room.
Install the faucet onto the sink or vanity countertop according to the product’s fitting requirements. Attach the hot and cold water hoses to their designated inlets, then tighten each connection carefully to create a secure fit without damaging the threads or internal seals.
Next, install the sink drain assembly. Depending on the product, this may include a drain flange, gasket, retaining nut, and pop-up stopper mechanism.
Use plumber’s putty only when the drain or faucet manufacturer permits it. Some assemblies require a specific gasket or silicone seal instead. Using the wrong sealing material can cause leaks or damage certain components.
Remove excess sealant and confirm that the drain fitting is seated evenly. If the vanity top or sink requires silicone around its edges, follow the manufacturer’s instructions and allow the sealant to cure for the recommended period.

Step 6: Connect the Hot and Cold Water Supply Lines
Flexible braided supply hoses are commonly used to connect a bathroom faucet to the hot and cold water shutoff valves. These hoses carry water from the household supply to the faucet, making them an important part of bathroom vanity plumbing.
Begin by identifying the hot and cold inlets on the faucet. Attach the corresponding supply hoses according to the manufacturer’s instructions, checking the markings to avoid reversing the connections. Properly connecting the faucet supply lines helps ensure that hot and cold water flow from the correct sides.
Next, connect the other ends of the hoses to their matching shutoff valves beneath the sink. Arrange each hose in a smooth curve so it does not twist, kink, stretch, or rub against sharp cabinet edges. If you’re still planning your vanity setup, our guide to cultured marble vanity tops with integral sinks explains important sink and faucet configuration considerations when choosing a vanity top.
Tighten each connection by hand first, then use a wrench only as recommended by the fitting manufacturer. Overtightening can damage threads, washers, or valve components, potentially causing water leaks after installation.
Avoid applying thread-sealing tape to every connection automatically. Many flexible faucet hoses use rubber washers or compression fittings that create a seal without tape. Follow the product instructions and use an approved sealing material only where the connection design requires it.
Finally, check that the shutoff valves and supply hoses are compatible. If the fittings do not match, use the correct replacement components rather than forcing the connections together. Once everything is connected, slowly restore the water supply and inspect each joint for leaks before using the sink.
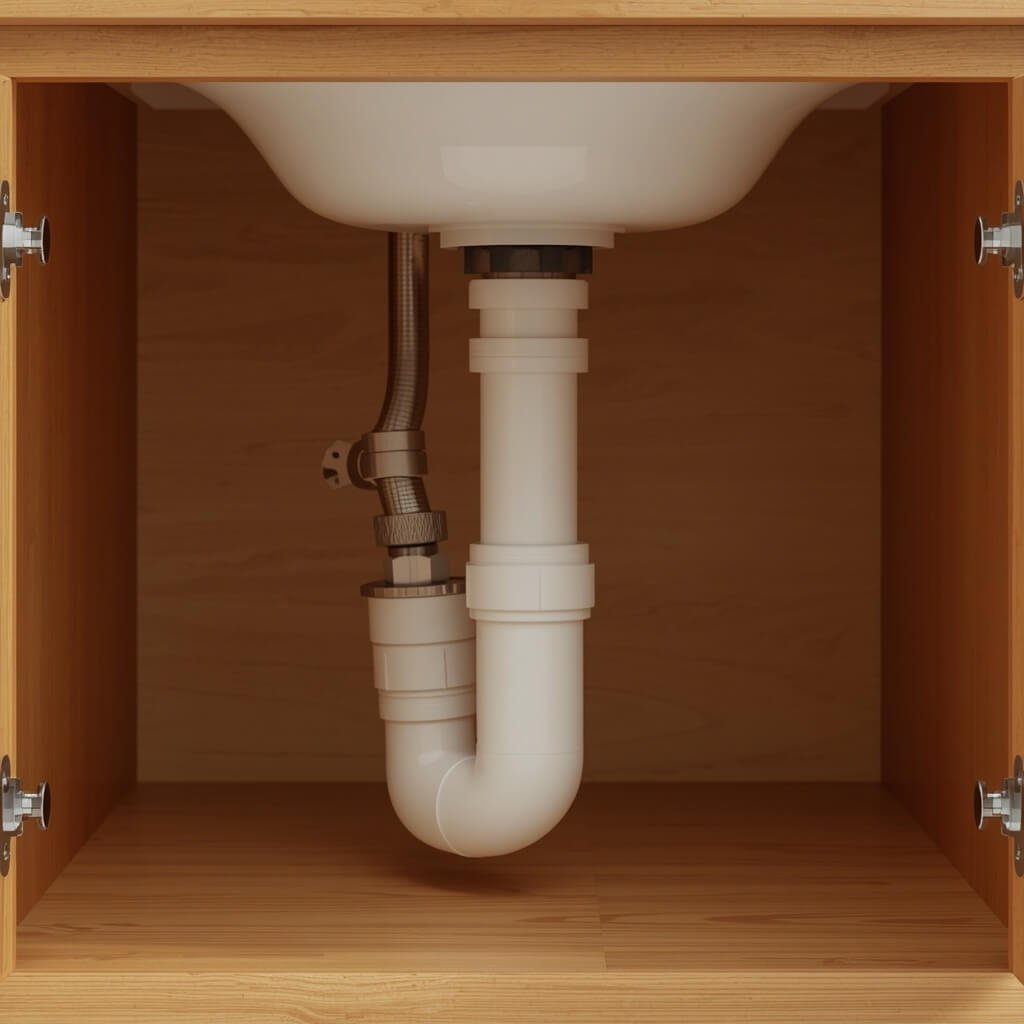
Step 7: Install the P-Trap and Connect the Drainpipe
The P-trap connects the sink drain tailpiece to the household drainpipe. Its water seal helps prevent sewer gases from entering the bathroom.
Position the trap beneath the sink and check that it aligns with the wall drain connection. Install the trap components in the correct order, using the supplied washers and slip-joint nuts.
For a typical plastic slip-joint assembly, the beveled washer must face the correct direction to seal against the fitting. Follow the manufacturer’s instructions for its orientation and tightening method.
Adjust the tailpiece or approved extension tube if necessary. Cut plastic pipe only when the fitting design permits it, and remove rough edges before assembly.
The finished drain should slope appropriately toward the drainage system, without unnecessary bends or strained connections. Avoid creating an improper S-trap or altering the venting arrangement to make the pipes fit.
If the wall drain is too high or too low, or the trap cannot connect without awkward angles, stop and have a plumber assess the layout. A poorly arranged drain can lead to slow drainage, recurring clogs, or sewer-gas problems.

Step 8: Check Every Connection for Leaks
Testing the plumbing after installation helps identify loose connections and small leaks before they cause water damage to the vanity cabinet, bathroom floor, or surrounding walls.
First, confirm that the faucet is turned off and all plumbing connections are properly secured. Slowly reopen the hot and cold shutoff valves, then inspect the supply hoses and valve connections for moisture or dripping water.
Run cold water through the faucet, followed by hot water. Carefully examine the faucet connections, drain flange, drain tailpiece, P-trap, and wall drain connection. These areas should remain dry while the water is running.
Next, partially fill the sink and release the water to test the drainage system under a stronger flow. Watch the P-trap and slip-joint connections as the water passes through the drainpipe. Use a dry paper towel around each joint to detect moisture that may not be immediately visible.
For additional guidance, consult the U.S. Environmental Protection Agency’s home maintenance and leak prevention guide, which explains how to inspect faucets and look for leaks around plumbing connections.
If you discover a leak, shut off the water supply before inspecting or adjusting the connection. Identify the cause rather than repeatedly tightening the fitting, as overtightening can damage washers or threads.
Finally, watch for slow drainage, unusual gurgling, or persistent sewer odors. These symptoms may indicate a blockage, an incorrectly aligned drain, or a venting issue that needs further investigation. If the problem continues after checking the visible connections, contact a qualified plumber.
Common Bathroom Vanity Plumbing Mistakes to Avoid
Even a straightforward installation can cause problems when small details are overlooked.
- Using the wrong fittings: Confirm that the faucet hoses, shutoff valves, drain tailpiece, and P-trap are compatible before assembly.
- Overtightening connections: Excessive force can damage washers, plastic nuts, threads, and valves.
- Ignoring cabinet alignment: A cabinet that is not level can affect the fit of the sink, countertop, and plumbing.
- Forcing the P-trap into position: Misaligned pipes may leak or create drainage problems.
- Skipping the leak test: Small leaks can damage the cabinet, wall, or flooring over time.
- Closing off plumbing access: Keep shutoff valves and removable drain connections accessible for future maintenance.
Avoid making unnecessary changes to existing pipes. A simple replacement is usually easier when the new vanity fits the original plumbing layout.
When Should You Hire a Professional Plumber?
A DIY installation may be suitable when you are replacing a vanity with a similar model and the existing water supply and drain connections are in good condition.
However, hire a qualified plumber if the project involves relocating supply lines, moving the drainpipe, modifying venting, replacing damaged pipes inside a wall, or installing new shutoff valves that require specialized work.
You should also seek professional help if you discover persistent leaks, severe corrosion, recurring sewer odors, or drainage problems that cannot be resolved through proper assembly.
Local plumbing codes and permit requirements vary. Check the rules that apply to your property before changing fixed plumbing or carrying out work that requires a permit.
Frequently Asked Questions
Can I install bathroom vanity plumbing myself?
Yes, many homeowners can reconnect an existing faucet supply and drain system when the plumbing is accessible, compatible, and in good condition. More complex pipe changes may require a licensed plumber.
Does a bathroom vanity need a P-trap?
A bathroom sink generally needs an approved trap that maintains a water seal against sewer gases. A P-trap is commonly used when the drain connects through the wall. The exact arrangement must comply with local plumbing requirements.
Why is my bathroom vanity drain leaking?
Common causes include misaligned fittings, incorrectly positioned washers, damaged seals, loose connections, or incompatible drain parts. Identify the source of the leak and correct the connection rather than overtightening every nut.
Should I install the faucet before or after the vanity?
Installing the faucet and drain on the sink or countertop before placing it on the cabinet often provides easier access. However, the best order depends on the vanity design and manufacturer instructions.
Conclusion
A successful bathroom vanity plumbing installation depends on accurate measurements, properly matched fittings, and secure drain and water supply connections. Take time to inspect every joint and test the sink for leaks before storing items inside the cabinet. If you’re still deciding which cabinet will suit your bathroom, read our guide to what a bathroom vanity is and how it works to better understand its components and function. For major pipe alterations or persistent leaks, consult a qualified plumber to help prevent water damage.
About the Author: Bilal Khan
Bilal Khan is a content writer with an interest in home improvement, bathroom design, and practical DIY guides. He enjoys researching bathroom vanities, plumbing basics, and space-saving ideas to help readers make informed decisions about their homes. His goal is to share clear, useful information that makes home improvement projects easier to understand.


Pingback: How to Remove Bathroom Vanity: Complete Guide